In December I decided I wanted to make candles out of recycled glass bottles (wine, liquor, beer, soda pop, water, anything!). Mostly because I had a ton of leftover soy wax from making teacup candles for my wedding. *Note to self: Talk about my wedding budget and creative crafts (a future post!!) Anywho….my lovely husband Kevin got me a bottle cutter for Christmas, I think he did it so he can “help” by drinking beer. But also a little part inside me was craving more DIY after the wedding. So here is a tutorial type post on Glass Bottle Cutting 101.
Supplies: Bottle Cutter, Sand paper grades 60 (coarse) and 120 (fine), lots of glass bottles, boiling water, jug of ice water, oven mitt, and tongs.
An hour or so before you start scoring bottles you want to set a pot of water to boil (make sure water and pot itself are deep enough to cover where your scores will be when your bottles are upsidedown) and an equally deep jug of ice water, keep cool in fridge.
Here are some beer and larger miscellaneous bottles I started with:


And my bottle cutter (g2 bottle cutter):
So you want to make sure your bottles are nice and clean where you are going to score where you want your cut. (because a bottle cutter doesn’t technically “cut” the glass it just scores it). Follow YOUR bottle cutter directions, but simply it’s placing and moving the measured pieces in and around your bottle. Then holding the bottle in one hand (my left in pic) and the cutter in the other (my right in pic), lightly pushing the bottle toward the cutter (the green handle part in pic) while you rotate the bottle slowly, all while pushing the flat metal (part B in pic) toward the bottle. So pretty much lightly pressing in opposite directions while rotating the bottle to score. DO NOT go over your score once you’ve completed the circle, there will be a slight scraping sound to let you know you’ve completed the circle/score.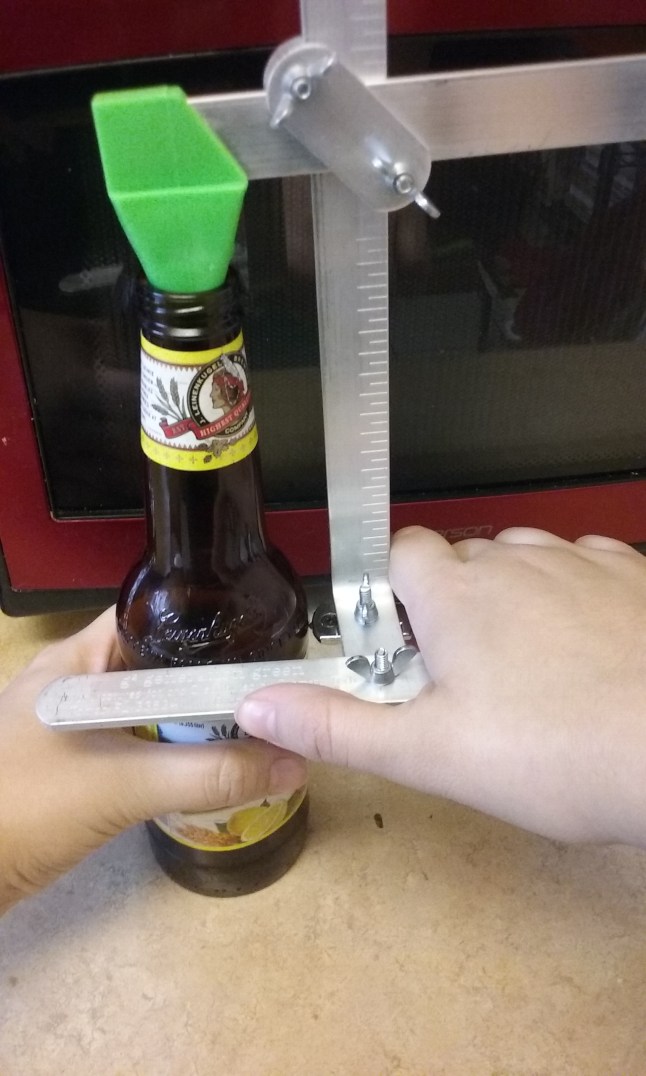
After you have scored all your bottles go to your boiling water and bring down to a simmer. Set your ice water close by. Wear protection (oven mitt) and keep your tongs nearby. 
You will dip the bottle into the hot water first. Upsidedown and make sure the score line is submerged. Hold for 10 seconds in hot water. Then quickly dunk into ice water, again with the score line submerged. Hold for 5 seconds in ice water. The shock is what will make the bottle split at the score line.


YOU WILL MOST LIKELY REPEAT THE HOT WATER/COLD WATER STEP A FEW TIMES BEFORE YOUR BOTTLE BREAKS.
It’s normal and will eventually break after 2-3 times of this back and forth. When in the ice water I will sometimes tap it lightly on the side of the jug, sometimes it will help the pieces separate.
Careful, the pieces may separate in the hot or cold water. Remove with tongs at the threads of the bottle top. Your pieces will be sharp!


Set aside to dry and carefully bag up the pieces to discard.
After all dry, you want to sand the sharp edges down with the 60 grade sandpaper FIRST then the 120 grade sandpaper SECOND.


I cut my paper to fit inside a box to keep the fine ground glass from blowing everywhere. Just turn bottle upside down and move back and forth and twist to grind. Some of your bottles may be cut unevenly, I just took an extra piece of sand paper and sanded the uneven parts down a bit.
Then your bottles should be good for drinking glasses or in my case future candles or what your heart pleases! Here’s how mine turned out:


Success!! Happy bottle cutting!
Love,
B


2 thoughts on “Cutting Glass Bottles: Upcycling and Crafts Part 1”